Wednesday, March 23, 2011

Storm Troopers - Airborne 101 & 102

"Storm Troopers are highly-trained shock troops forming the elite force that is a Storm Trooper regiment. They are trained to carry out special operations such as deep strike assaults, reconnaissance, and infiltration beyond enemy lines. Storm Troopers are the very best soldiers the Imperial Guard has to offer, being trained to the peak of human perfection, their combat skills are unmatched within the ranks of the Imperial Guard."
- Codex: Imperial Guard (5th Edition)

I just finished painting the 2nd squad of storm troopers, and since I now have two fully painted squads, I started wondering about how to play them to get full value for money (read: points). Looking at the special operations rule I see one thing that really makes them interesting from a tactical point of view and that is the flexibility the spec. ops rule gives them.

Until recently I’ve played the storm troopers as a 10 man unit with two meltas and a power weapon. They were to deep strike behind enemy amour or heavy infantry / power amour and take them out. It has however become evident to me that the drop-close-to-enemy-hammer-unit-strategy is suicide! Paying a lot of points for a fully tooled squad, that gets to fire for one round is not going to give return on investment.

So what I think I’ll do in the future is two 5 man squads with 2 special weapons (melta or plasma), who is to function as a rescue unit, sacrificing itself where the fighting gets too tough for the regular grunts in the army. While their ap3 guns are nice, storm troopers will, all in all, still be outgunned by regular infantry, so the gain I see is their tactical flexibility…

Here are my squads (I still have one unpainted, but 3 squads in one armylist might be overdoing it...):
Airborne 101:


Airborne 102:


/Nicolai aka Atoom

Tuesday, March 22, 2011

Display Cabinet - IG Dioramas II

I showed two IG mini-dioramas the yesterday, but just came to think of this one that is in fact the first of the mini-dioramas I did. It was done quickly, and it shows, as mold lines and transfers really don’t work well, but I just thought that I would show it anyway, as it was in fact the one that spawned the idea behind doing the dioramas in the 1st place. It was creted using a plastic cadian trooper and a leg from the WFB zombie sprue.

This one is called 'The dancing accident':


/Nicolai aka Atoom

Monday, March 21, 2011

Display Cabinet - IG mini-dioramas

Following the release of the Cadian trooper box, I was (as mentioned earlier) very inspired by the grunts. The multipart kits inspired me to try out some modeling of scenarios that had otherwise been out of my league, as modeling metal minis will never work for me.

The first mini-diorama is titled ‘Resting Guardsman’ and was made to try to show another more peaceful side of the guard. Sitting on his backpack this trooper has taken up study of the Tactica Imperialis to kill time.


The other mini-diorama is entitled ‘The Ripper Incident’ and was made after a friend of mine gave me a ripper and started arguing how cool it would be if a poor trooper had it bursting out of him like in the movie Alien. This one had some bits from the Forgeworld veteran upgrade pack mixed with standard Cadian trooper bits.


/Nicolai aka Atoom


Sunday, March 20, 2011

Knight Commander Pask

The ace of the Russ – Crack shot and high BS. Sounds good, but in my mind it doesn’t really make the cut, at least not in the standard Russ. In my usual games, we play 1500-1750points, and that leaves little room for 50 point upgrades on the Leman Russes that finds their way into that list…

Reason for me bringing Mr. Pask up is that I’m currently painting a vanquisher, which in my mind is the only good option for a tank ace as Pask’s special rules are related to tank hunting and the Vanquisher is the only tank hunting Russ in the IG codex.

I’m currently thinking in the lines of an IG ‘hero’ list, where I chuck as many named characters into the list as the points will allow – A list like that is likely the only time I’ll ever get to use him in a real game. I bought a 2nd hand vanquisher with a nice tank ace in the turret, but newer got around to painting it – Until now that is.

The vanquisher will follow soon.


/Nicolai aka Atoom

Saturday, March 19, 2011

Modelling smoke

Several of my projects include smoke, rocket blast, flamer fire etc and today I’m going to show how to achieve that effect easily.

Tools needed are:
  • A drill & a piece of wire (old paperclips works well)
  • Super glue
  • PVA glue
  • Foam – I use GF9 Scenic foam, but I suspect that an old foam madras will work fine as well…


Making the Smoke / blast effect:
Drill a hole where you want your smoke to originate from and glue the wire in place. Once dry, cut the wire to fit the length of the blast/smoke. The wire is intended to support the foam, so it should have same length as your smoke column.

Pick out some foam for building the smoke and thread that onto the wire.

Make a dry fit after setting foam on the wire to check that you like the result

Mix PVA glue and water evenly 50:50. You want to thin the glue so that can be absorbed by the foam. Apply that to the foam. It is important that the foam is soaked, as it is the PVA that hardens it after it has dried up.


Find a suitable place for your creation to dry – No good leaving it on the table, as that will result in the foam being glued to the table. I just hang my stuff from the lamp.

Wait for it to dry and paint you new model up – Enjoy!


/Nicolai aka Atoom

Friday, March 18, 2011

Battle Chronicler – Battle Reports made easy?

Yesterday I posted a battle report that was done using Battle Chronicler – A free tool that allows you to make battle reports documenting you glorious battles. The application can be found here: http://battlechronicler.com/


Here are my experiences with the application:

Installing the application:
I had a little trouble upgrading my .NET framework to match the v4.0 required for the Battle Chronicler installation file to run, but after a few attempt I managed to install the application. I also installed the additional terrain components found on the Battle Chronicler home-page.

Opening the program for the first time:
The application was relatively easy to use, but I strongly recommend that you watch the two introduction movies in the Help section of the web-page, to avoid suckering around the application making a wrong start of your battle reporting! If you miss the concepts on template lists and setup of components, then you’re going to spend many hours doing something that is not reusable.

Making terrain components:
I noticed that it was possible to integrate pictures of own terrain, so I wanted that from the start. After photographing all the terrain and cleaning the background I started setting the terrain components up. Basically it is just a matter of selecting a picture and entering the dimensions of the terrain - Easy but boring when you’re doing 25 pieces in one go! Luckily this is supposed to be a one-time exercise.

Setting up army templates:
For the battle report I prepared two lists – One for Imperial Guards and one for Space Marines. The program is suited for any system, and this quickly became a limitation, as it did not support units with models of varying base-sizes (e.g. IG infantry squad with a heavy weapon team). It was quite simple to set up the lists, and make workarounds for the inability to mix base sizes in a unit. Make sure that you get the base sizes and details correct, or you’ll regret it later!

Starting a new battle report:
Setting up a battle is easy – IF you have done your homework, and if you have made it right! I set up both armies using templates, so that was manageable, and that made it easy to go straight to terrain setup.

Setting up terrain:
I had some minor problems with wrong measurement definitions of the terrain components, so I had to go back to components and correct that before setting up the terrain. Setting up terrain took about 15 minutes, to get the 22 pieces aligned correctly on the table. I had two pictures to work from, and as advice you should place markers to guide you. I marked the two center lines (using some of the red plastic measures from the w40k starter kit) before taking the photos, making it easier to align the pieces correctly.

Deployment:
Again working from two pictures, one from short table edge, and one from the long, with guide markings on the center lines, and using terrain as a guide I managed this relatively quickly (15 min). The deployment was made a bit cumbersome, as the application is (in my opinion) best suited for rank and file units. This meant that I had to manually place every trooper. A few times I dropped some troopers too close to the board edge, making the unit behave oddly. That meant that I had to completely remove the unit and start over.

Recording the turns:
Drag your minis around, and drop them – In theory easy in practice hard! I wasn’t doing the reporting real-time, meaning that I had to work from a few notes and pictures. Battle Chronicler requires you to do the reporting sequential, meaning that previous turns are locked – So if you forget to move a unit, then you have a lot of refactoring to do!  I would say that it is manageable to do the reporting, but for Warhammer 40k you have our work cut out placing the troopers, and aligning the units and vehicles. One of the biggest problems was that moving and turning a vehicle wasn’t quite intuitive, and caused a lot of frustration, before getting it right. I think that I spend on average 20 min / turn, making the report.

Finalizing the report:
I wanted images for my blog, so for terrain, deployment, turn 1 player 1, turn 1 player 2 … turn 6 player 2 I had to make a picture – BORING! None the less manageable, but it took 5 minutes, bringing total reporting time (not counting terrain definition) up to more than 2½ hour – more than the time it took to play the game!

The bugs!
Components being corrupt – Two of my terrain components were corrupt, causing me to have to redo them every time I opened the battle report. That was very annoying, and would have been quite a problem had I not been able to do the report in one go.
Units not remembering the facing set by the user – I had several vehicle units that refused to accept the facing I set for it. A general trend was that they positioned themselves north-south after being moved. Manual button bashing, allowed me to rectify the worst problems, but it almost made me abandon the application.

Conclusion:
Being free puts this in its own league – Many thanks to the developer. That being said, I do find that the result looks nice, but is extremely cumbersome to produce. I think that it is likely to work much better with Rank and file armies and that w40k is not well supported. All in all a good application, but a tad too cumbersome for my liking.

/Nicolai aka Atoom

Thursday, March 17, 2011

Battle Report - DECOY!

After reading about Battle Chronicler on a forum a short while back, I simply had to try it out for battle reporting. The report below is the result of testing the Battle Chronicler software that can be downloaded for free on http://battlechronicler.com/ I’m not going to review the Battle Chronicler software here, but I’m sure that you’ll get my comments to the application in a later article.

The game played was one of the missions from the Emperor’s Chosen XI tournament pack. When I attended the tournament I didn’t get at chance to play the Decoy scenario as defender, so I had to give that a try…

DECOY!

Attacker’s Briefing: A transport vessel carrying important data has been shot down by the enemy. The stasis chests onboard the vessel are now scattered across a large area. Use your scanners to locate the right stasis chest and secure the important data before it falls into enemy hands!

Defender’s Briefing: Your forces have successfully shot down an enemy transport vessel. Suddenly, you find yourself under attack from an enemy raiding force searching for something in the vicinity of the wreckage. Judging by the rapid and forceful attack by the enemy, they must be seeking something important. Secure all the wreckage from the ship and repel the attackers!

Special Rules: Attacker Priority, Counters, Deep Strike, Infiltrate, Outflank & Reserves.

Set-Up:
1) Roll a dice. Winner gets to choose deployment zone.
2) Before both armies are deployed, the defender places three Counters. These counters must be placed 18” from the defender’s long board edge, and minimum 15” apart and 15” from the short table edge. Then the attacker secretly chooses which counter is the primary objective. Write this down on a piece of paper.
3) The attacker deploys his entire force first. Then the defender deploys his entire force.
4) The attacker gets the first turn.
Reserves: The defender may place one unit (max. 10 models, with up to 1 Independent Character attached, and a dedicated transport) in reserve. The attacker may not use reserves except for deep striking or

Game Length: The game lasts for six turns.
Line of Retreat: Towards own table edge.

Primary Mission Objective: The attacker must control the primary mission objective at the end of the game in order to win. If the attacker does not control the Counter the defender wins. The winner is awarded 20 BP’s and the loser is awarded 0 BP’s.

The Armies (1600points with S3 armyselection restrictions):

Space Marines (Attacker):
Chaplain (JP & Power Fist)
9 Assault marine squad (Power Fist)
10 Tactical marine squad split in combat squads (Rhino, Melta, Lascannon)
10 Tactical marin squad split in combat squads (Rhino, Melta, Lascannon)
5 Tactical squad split in combat squads (Heavy Bolter Razor Back)
Vindicator
Reserves:
5 Terminators (Chain Fist & Cyclone Launcher)
Venerable Dread in Drop pod
2 Landspeeders squadron (Multi Melta & Heavy Bolter)

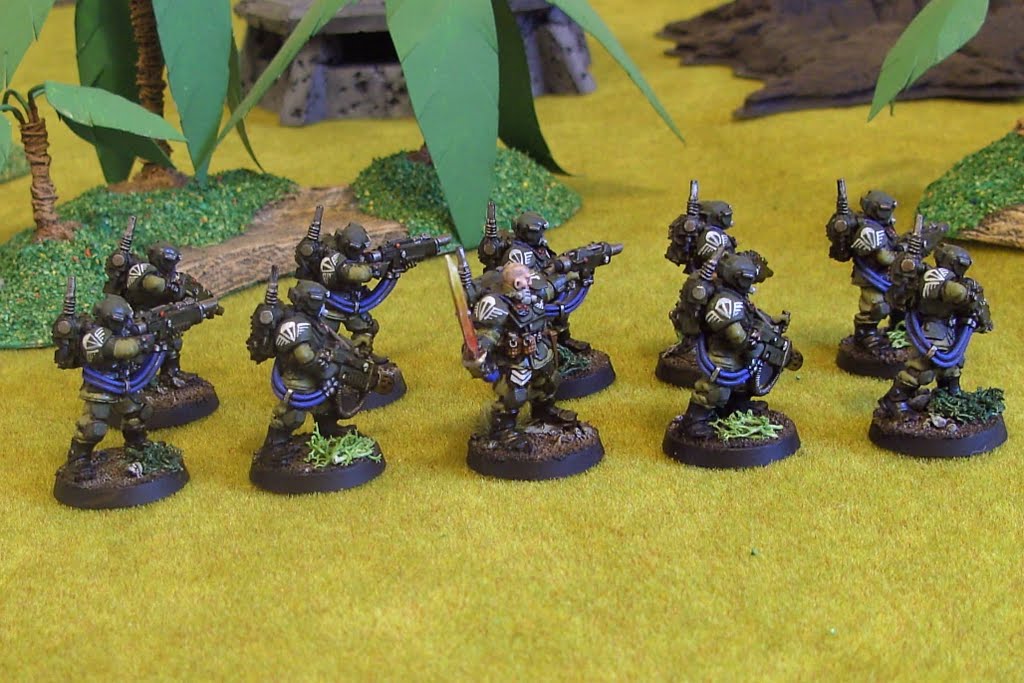
Imperial Guard (defender):
Company Command Squad (Regimental Standard, 3 Sniper, Body guard)
Company Commander(Plasma Pistol & Power Weapon)

Infantry Platoon (41#, 405 pts)
5 Platoon Command Squad
10 Infantry Squad (Heavy Weapons Team - Lascannon)
3 Heavy Weapons Squad - Missile Launcher
3 Heavy Weapons Squad - Autocannon

2 Leman Russ Battle Tank in squadron (Lascannon & Heavy Bolter Sponsons)
10 Storm Trooper Squad (2 Meltagun & Power Weapon)
5 Ratling Squad
2 Scout Sentinel in squadron (Autocannon)
1 Manticore Rocket Launcher
Reserves:
Valkyrie Assault Carrier carrying 10 Veteran Squad (3 x Plasmagun & Plasmapistol)

Terrain setup
The downed transport vessel was located in the middle of the defender’s deployment zone with jungle and a wood just north of the crash site. The three objective counter was placed with the center one on the hull of the wreck and the others left and right of that (marked with a red *).


Deployment:
The attacking marines deployed with the vindicator in the middle and Razor Back, Rhino and one combat squad carrying a lascannon the left. On the right flank the other combat squad carrying a lascannon, the Chaplain and Assault marines and the last Rhino took up positions.
The IG set up a gunline with Compagny Command in the middle flanked by heavy weapons squads. Left flank was held by Ratlings, the Leman Russ squadron and the Manticore Rocket Launcher. The other flank was left to the platoon commander and his squads with lascannons and the scout sentinels on the far right. Infiltrating storm troopers takes up positions on the wreck to guard the middle objective.


Turn 1 - Marines:
The Razorback roars forward and takes up position behind a ruin on the left flank. On the right the combat squad in the Rhino and the chaplain and assault marines takes up position around the wood. As the shooting starts the storm troopers takes a beating, loosing half of the squad, but manages to keep their cool.


Turn 1 - IG:
The platoon commander moves forward on the right and takes up position on the hill on the right. The company commander orders the missile launchers to fire on the Vindicator, resulting a devastating hit on the tank. The Autocannon teams then scores a hit on the razorback on the left flank, immobilizing the tank. Following that all fire is directed to the chaplain and his assault marines, resulting in 6 fatalities in the squad.


Turn 2 - Marines:
At the start of the second turn both Terminators and the land speeder squadron arrives. The land speeders suffer a mishap and arrive in the woods instead of next to the IG tanks. The shooting that follows kills the remaining storm troopers and decimates the platoon command squad and the 3rd infantry squad. The Chaplain assaults the 1st infantry squad, killing them all in a sweeping advance. On the right flank the remaining assault marines assaults the scout sentinels, locking the units in a bitter fight.


Turn 2 - IG:
Just as the right flank looks like it is collapsing the Valkyrie and veterans arrive from reserve and engages the Terminators. In the shooting that follows their arrival the terminator squad is cut in half. The shooting ordered by the company commander inspires the heavy weapon teams to destroy both Rhinos. The Chaplain is killed by massed infantry fire and the shooting from the Leman Russ tanks makes a heavy impact on the land speeders – One is killed the other stunned. The Manticore’s storm eagle rockets makes short work of the marines who had just evacuated their Rhino.


Turn 3 - Marines:
Following the collapse of the right flank the terminators decide to take on the veterans, while the remaining squads fire at the guardsmen, hoping to break their morale. The Assault on the veterans cost almost half of the unit to die, but they manage to hold their ground.


Turn 3 – IG:
The Leman Russ squadron begins to move forward on the left objective. The Valkyrie leaves the veterans, as their fate is now in the power fists of the Terminators. The shooting that follows kills the last land speeder and a couple of marines. Then the terminators break the veterans, who are now below ½ strength and fleeing for their lives.


Turn 4 - Marines:
Falling from the sky a drop pod brings the venerable dread into action (we forgot the drop pod assault rule!). The dreadnaught is lined up perfectly for shooting his multi melta at the tanks, but only manages to score a shaking hit on one of the Leman Russ tanks. On the right flank the terminators kills the platoon commander and moves on towards the 3rd infantry squad. The remaining assault marine manages to finish off the sentinels and moves in on the Valkyrie.


Turn 4 - IG:
Acknowledging that right flank is collapsed the 3rd infantry squad embarks in the Valkyrie and is flown to safety close to the rightmost objective. The fleeing veterans manages to get their revenge, killing the terminators with massed plasma fire. The dreadnaught draws a lot of fire from the heavy weapons, but stands unscratched. Random fire takes out several marines, breaking the morale on one of the combat squads.


Turn 5 - Marines:
The venerable dread makes a move on the Leman Russ tanks, blowing one of them up. Lascannon fire destroys a weapon on the other.


Turn 5 - IG:
Having shot off all storm eagle rockets the Manticore rams the dreadnaught, but fails to do anything. The 3rd infantry squad disembarks and shoots the remaining assault marine. Massed fire on the dreadnaught fails to make an impact. The remaining Leman Russ destroys the remaining members of the combat squad north of its position.


Turn 6 - Marines:
The venerable dread tries to kill of the armour blocking its access to the left objective, but in vain – The marines are unable to repel the defenders!


Turn 6 - IG:
All able guns fire at the Dread – It suffers multiple penetrating and glancing hits, but as the smoke clears it stands…


Despite the casualties the Marines were very close to claiming the victory – Had it not been for the Manticore Ramming the dread, blocking him from claiming the objective.

/Nicolai aka Atoom

Tuesday, March 15, 2011

Painting terrain in 30 min

Just a short note on the latest thing leaving my paint station – a broken Aquila from the Honoured Imperium set from GW. I painted this one with a combination of airbrushing and dry brushing in less than 30 minutes!

The Aquila was airbrushed with a dark brown and two reds and the earth around it was dry brushed with scorched brown and bestial brown – Finally rocks and skulls were painted and washed with black & brown washes.

I’m quite happy with the result and I’m really looking forward to having this piece on the battlefield for today’s gaming session. I have a set of the GW Battlescape that I’m looking forward to painting in a similar fashion.


/Nicolai aka Atoom

Sunday, March 13, 2011

Display Cabinet - Necron Dioramas

When the Cadian plastics were released I simply had to have a box or two – For a short while the Cadians almost pushed my Catachan troopers aside, but after a while I came to my senses and returned to the jungle :o)

The Cadian trooper boxes have a lot of nicely detailed models that cry out for converting and modelling. One evening after watching “T2 – Judgement day” I felt inspired to do some man vs. machine. That inspiration led to two small dioramas where the IG grunts take on a Necron warrior. The modelling of the Necron was actually the hardest part, as the warrior model is quite static in its pose and setup.

Enjoy!


/ Nicolai aka Atoom